Git - Version Control(Cheat Sheet)
#iwritecode #learncodeonline #github #fullstackdeveloper


In this blog I will tell you everything you need to know as a begineer about GIT
What is GIT ?
- GIT is a version control system(VCS) which helps you to keep and maintain all the versions of your source code step by step. Every ittle change that you make in your code editor while developing an application is tracked by GIT when it is initialized. It is an awesome tool to help maintain your code and also collaborate with other developers.
- GIT is opensource
- It was introduced by Linus Torvalds in the year 2005
Why learn GIT ?
- Keep track of your source code while you make any changes
- You can revert back to initial state of the source code for your project
- Introduce new features into your existing project without effecting the original code
- You can collaborate with other developers easily on the same project
- Find out who and when is making changes to the source code
- Fast Development and many more
GIT VS GITHub. What are they ?
GIT is the version control system which enables you to manage, maintain different versions of your code , collaborate wirh all the other developers to develop your application.
GITHub is the online hosting platform which helps you to host your code on the web. There are many other online hosting platforms like GitLab,Bitbucket and more.
In sort you should know that GITHub is dependant on GIT for all it's operations and the vice versa is not true. Many developers gets confused between GIT and GitHub, so you should make a note of it. GIT can work with any version control system of your choice.
Now Let us understand about GIT and it's basic commands which you will need if you are doing any sort of development
GIT Architecture
Let me explain you a bit about your Local Repository(i.e. when files are on your computer) and Online Repository(i.e. when you host your project from your machine to any hosting platform like Github or GitLab or BitBucket)
Let me talk about Local Repository(i.e. when you are working on your local machine)
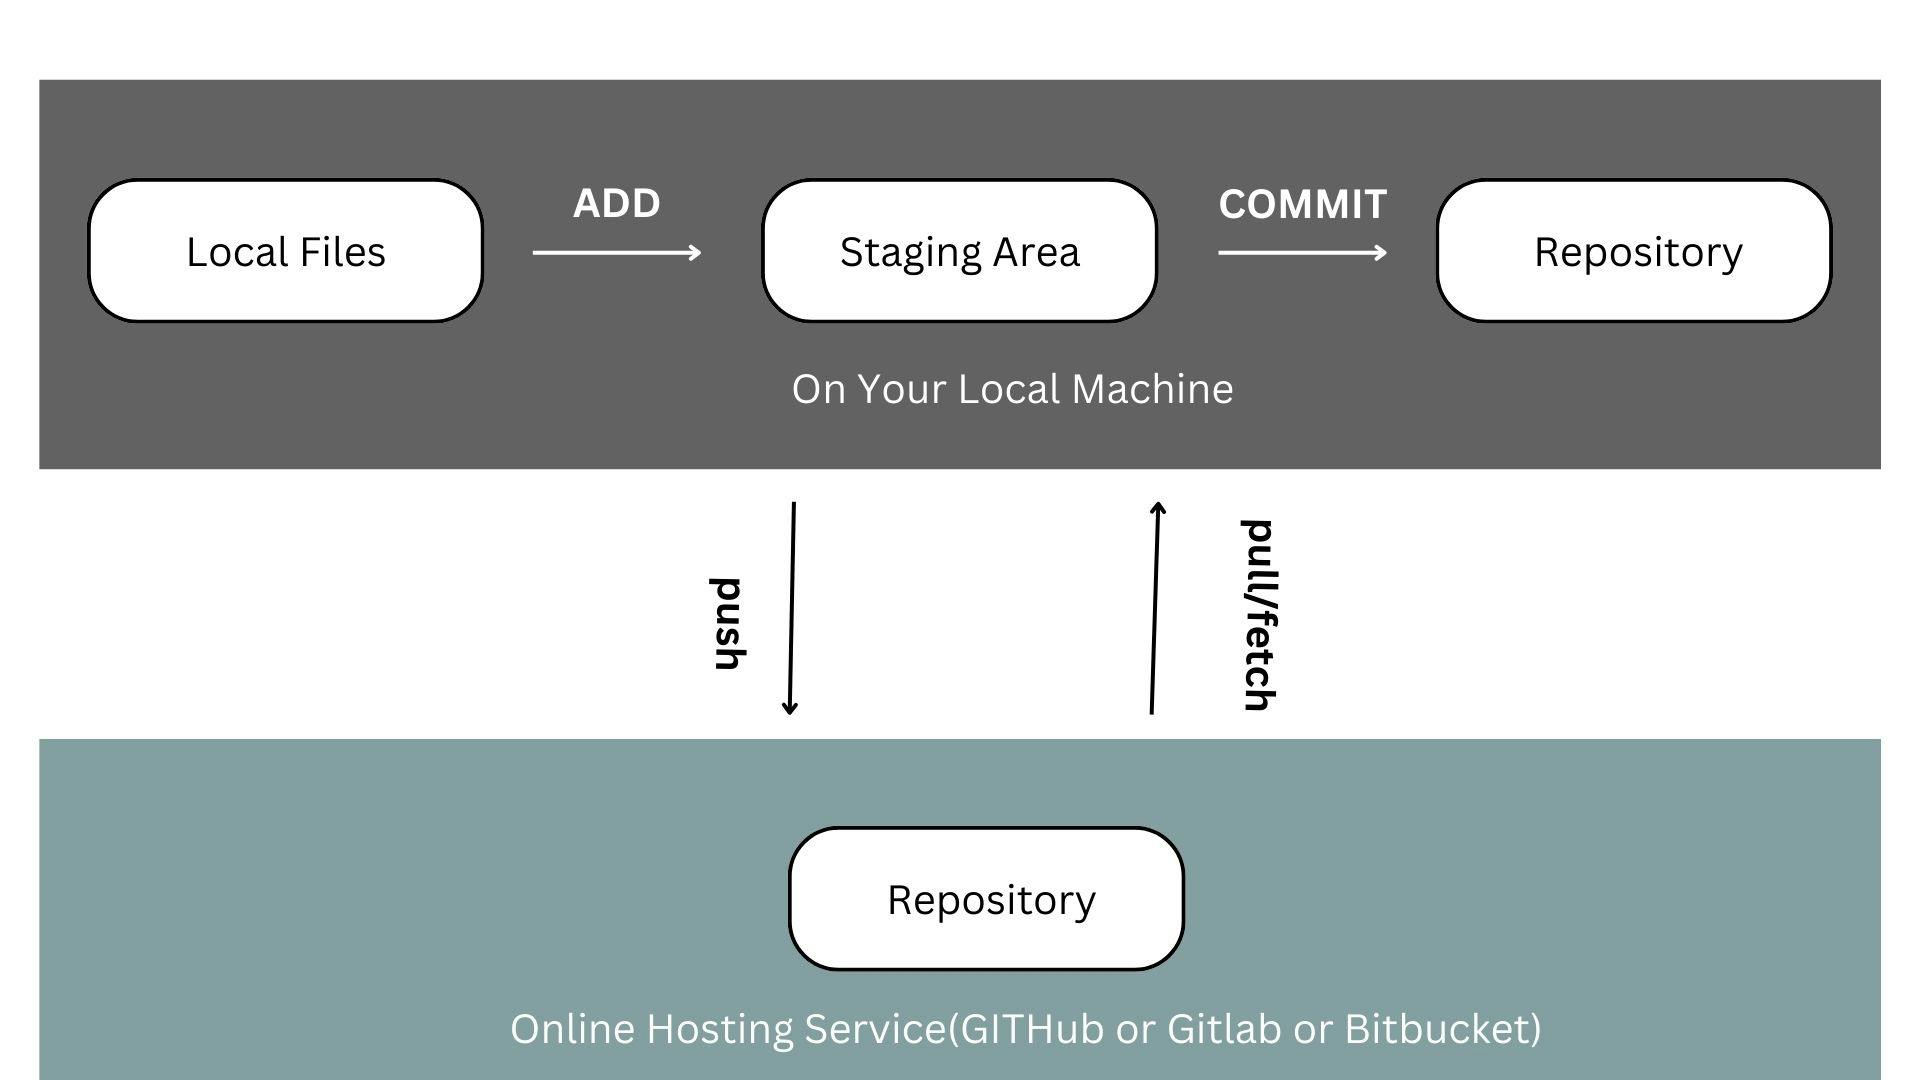
So there are 3 main stages of GIT in your local machine:
- Local Files ---> When GIT local repo is inititated and all of your project files are waiting to be added to the staging area
- Staging Area ---> When you have added all your files , the files sit on the staging area on your local machine waiting to be commited
- Local Repository ---> Once the files are on staging area, you have to commit those files with a appropriate message using a GIT command and all of them move to your local repo. Now all these files sit there to be pushed on any online hosting platform .
Now let me talk about Online Repository(i.e. when you host your project from your machine to any hosting platform like Github or GitLab or BitBucket)
So once all the files are commited to your local repository and they are sitting ready to be pushed onto some online platform. You follow the steps below:
- First of all create an account on some platform like GitHub or GitLab or BitBucket or any platform of your choice.(I will talk you through the process of GitHub here)
- Now create an online repo on the Github
- Now set the remote origin head using the Git command
- Then push all your Code onto GITHUB
- And once you do that all your code is visible to everybody on GITHub.
Now that you have a brief overview on GIT and GITHub . I will provide you with some of the basic commands that you will need to get started. You can see the command and it's description written side by side
GIT Commands
- git init //initialiazing local git repo
- git status //checking current status
- git add . //to add all files at once to staging area
- git add "filename" //to add a particular file to staging area
- git commit -m "your message" //commiting files from staging area to local repo
- git diff //to see the changes made to any files
- git diff --staged //to see the changes made to any files placed on staging area
- git log //to see all the logs that are made while adding & commiting files
- git log -n //to see any particular number of logs
- git log --author="git username" //to see logs made by any particular person
- git log --since=date and --until=date //to see logs within a particular time frame
- git checkout // to revert back to earlier code for files
- get checkout -- file name // to revert back to earlier code for a particular file
- git branch //to see on which branch are you working currently
- git branch branch_name // creates a new branch for you
- git checkout -b branch_name // creates a new branch and shifts to that new branch
- git checkout branch-name // helps you to switch to the given branch name on your repo
- git branch -m prev_b_name new_b_name // renames the branch
- git diff b1_name..b2_name // lists out the differences between the branches
- git branch -d b_name // deletes the branch for you
- git merge //performs merging of new code to the branch you are on
- git remote // shows shallow details of remote origin
- git remote -v //gives detailed view of remote repository name
- git remote add origin url //connects your local repo with the online repo
- git push -u origin //pushes code from local repo to remote repo
- git remote set-url origin git-repo/new-repository.git //helps in re-setting remote repo url
- git fetch //keeps the local main branch and master origin in sync with remote main branch
- git clone repo_url //clones the project from remote repo to you local machine
- git pull //performs a git fetch + git merge from remote to local repo
With this I come to the end of the cheatsheet of GIT. All the basic commands are here with their description. Hope you enjoyed it. Thanks for reading. Happy Coding